Master cylinder — removal and installation
Warning: Do not drop or hit the master cylinder. If the master cylinder is dropped it may not be reused.
Caution: The master cylinder is designed to allow the piston to pop out and be exposed. Hold the master cylinder by the body not the piston or the master cylinder may be damaged. Do not try to remove the piston or allow the piston to be scratched or damaged.
Removal
1. Remove the engine covers (see Tune-up and routine maintenance).
2. Remove the windshield wiper assembly (see Chassis electrical system).
3. Remove the cowl assembly (see Body).
4. Depress the brake pedal several times and release the vacuum from the booster.
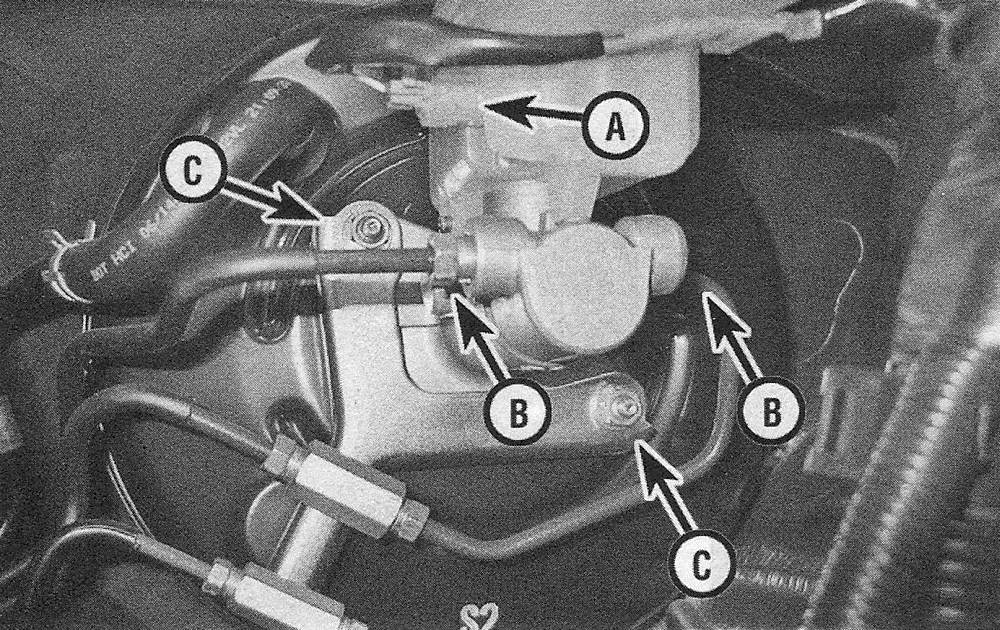
5. Unplug the electrical connector for the brake fluid level warning switch (see illustration).
8.5 Master cylinder details
A Electrical connector
B Brake line fittings
C Mounting nuts
6. Remove as much fluid as possible from the reservoir with a syringe.
7. Place rags under the fittings and prepare caps or plastic bags to cover the ends of the lines once they’re disconnected. Caution: Brake fluid will damage paint. Cover all body parts and be careful not to spill fluid during this procedure.
8. Loosen the fittings at the ends of the brake lines where they enter the master cylinder. To prevent rounding off the flats, use a flare-nut wrench, which wraps around the fit ting hex.
9. Pull the brake lines away from the master cylinder and plug the ends to prevent contamination.
10. Remove the nuts attaching the master cylinder to the power booster. Pull the master cylinder off the studs and keep the master cylinder level to prevent the piston from coming out. Again, be careful not to spill the fluid as this is done.
Installation
Note: When installing the master cylinder, remove the piston and port protective caps.
Note: If the piston gets dirty, clean it with a rag or cloth and apply lithium soap-based glycol grease evenly around the sliding portion of the piston. Do not use any other type of grease.
11. Install the reservoir cover, then install the master cylinder over the studs on the power brake booster and tighten the attaching nuts only finger tight at this time.
Caution: Keep the master cylinder level or piston end up as much as possible to prevent the piston from falling out.
12. Attach a pair of master cylinder bleeder tubes to the outlet ports of the master cylinder.
13. Fill the reservoir with brake fluid of the recommended type (see Tune-up and routine maintenance).
14. Slowly push the brake pedal down inside the vehicle — air will be expelled from the pressure chambers and into the reservoir. Because the tubes are submerged in fluid, air can’t be drawn back into the master cylinder when you release the pedal.
Caution: Have plenty of rags on hand to catch the fluid — brake fluid will ruin painted surfaces.
15. Repeat the procedure until no more air bubbles are present.
16. Remove the bleed tubes, one at a time, and thread the brake line fittings into the master cylinder. Since the master cylinder is finger tight, the nuts can be easily loosened and moved slightly in order for the fittings to thread in easily. Do not strip the threads as the fittings are tightened.
17. Fully tighten the mounting nuts, then the brake line fittings.
18. Fill the master cylinder reservoir with fluid, then bleed the master cylinder and the brake system as described in Brake hydraulic system — bleeding.
19. Installation is the reverse of removal. Test the operation of the brake system carefully before placing the vehicle into normal service.
Warning: Do not operate the vehicle if you are in doubt about the effectiveness of the brake system.