Air conditioning and heating system — check and maintenance
Air conditioning system
Warning: The air conditioning system is under high pressure. Do not loosen any hose fittings or remove any components until after the system has been discharged. Air conditioning refrigerant should be properly discharged into an EPA-approved recovery/recycling unit at a dealer service department or an automotive air conditioning repair facility. Always wear eye protection when disconnecting air conditioning system fittings.
Caution 1: All models covered by this manual use environmentally friendly R-134a. This refrigerant (and its appropriate refrigerant oils) is not compatible with R-12 refrigerant system components and must never be mixed or the components will be damaged.
Caution 2: When replacing entire components, additional refrigerant oil should be added equal to the amount that is removed with the component being replaced. Be sure to read the can before adding any oil to the system, to make sure it is compatible with the R-134a system.
1. The following maintenance checks should be performed on a regular basis to ensure that the air conditioning continues to operate at peak efficiency.
- ) Inspect the condition of the compressor If it is worn or deteriorated, replace it (see Tune-up and routine maintenance).
- ) Check the drivebelt tension (see Tune-up and routine maintenance).
- ) Inspect the system hoses. Look for cracks, bubbles, hardening and deterio Inspect the hoses and all fittings for oil bubbles or seepage. If there is any evidence of wear, damage or leakage, replace the hose (s).
- ) Inspect the condenser fins for leaves, bugs and any other foreign material that may have embedded itself in the fins. Use a fin comb or compressed air to remove debris from the condenser.
- ) Make sure the system has the correct refrigerant charge.
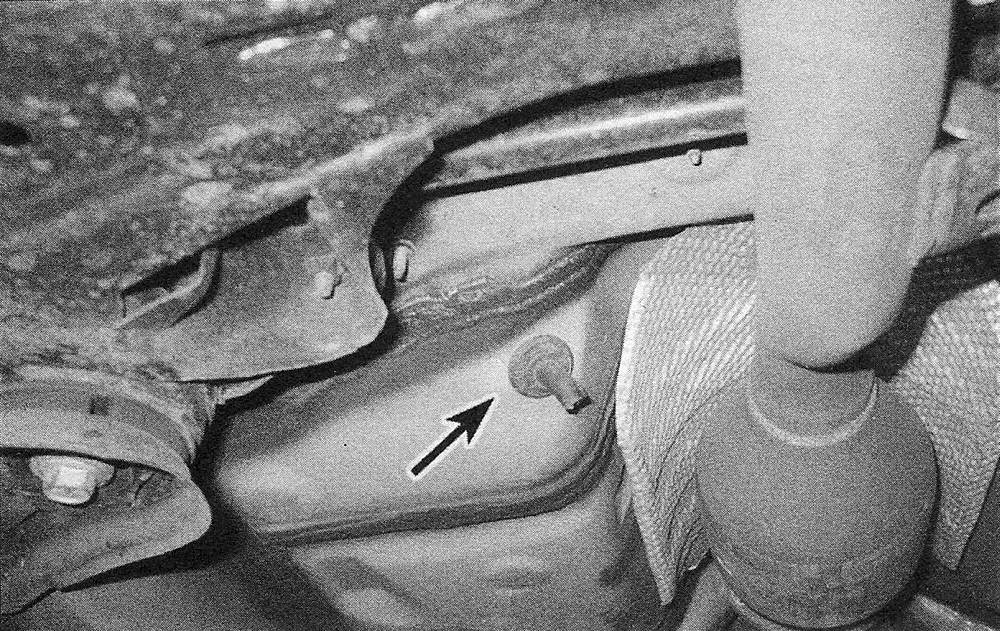
- ) If you hear water sloshing around in the dash area or have water dripping on the carpet, check the evaporator housing drain tube (see illustration) and insert a piece of wire into the opening to check for blockage.
3.1 Evaporator drain hose is located under the vehicle on the passenger’s side
2. It’s a good idea to operate the system for about ten minutes at least once a month. This is particularly important during the winter months because long term non-use can cause hardening, and subsequent failure, of the seals. Note that using the Defrost function operates the compressor.
3. If the air conditioning system is not working properly, proceed to Step 6 and perform the general checks outlined below.
4. Because of the complexity of the air conditioning system and the special equipment necessary to service it, in-depth troubleshooting and repairs beyond checking the refrigerant charge and the compressor clutch operation are not included in this manual. However, simple checks and component replacement procedures are provided in this Chapter. For more complete information on the air conditioning system, refer to the Haynes Automotive Heating and Air Conditioning Manual.
5. The most common cause of poor cooling is simply a low system refrigerant charge. If a noticeable drop in system cooling ability occurs, one of the following quick checks will help you determine if the refrigerant level is low.
Checking the refrigerant charge
6. Warm the engine up to normal operating temperature.
7. Place the air conditioning temperature selector at the coldest setting and put the blower at the highest setting.
8. After the system reaches operating temperature, feel the larger pipe exiting the evaporator at the firewall. The outlet pipe should be cold (the tubing that leads back to the compressor). If the evaporator outlet pipe is warm, the system probably needs a charge.
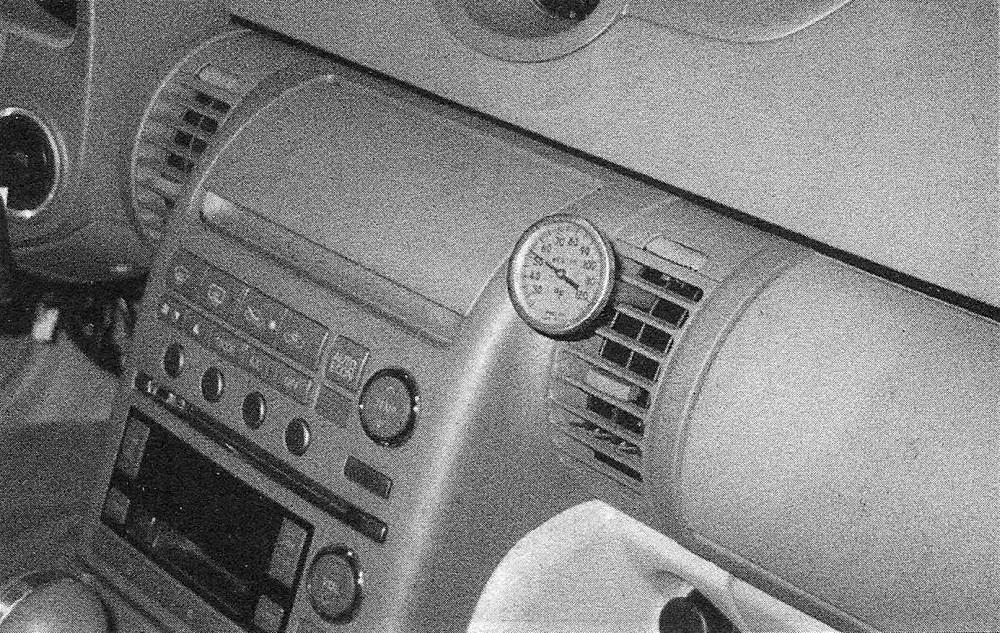
9. Insert a thermometer in the canter air distribution duct (see illustration) while operating the air conditioning system at its maximum setting the temperature of the output air should be 35 to 40 degrees F below the ambient air temperature (down to approximately 40 degrees F). If the ambient (outside) air temperature is very high, say 110 degrees F, the duct air temperature may be as high as 60 degrees F, but generally the air conditioning is 35 to 40 degrees F cooler than the ambient air.
3.9 Insert a thermometer in the canter vent, turn on the air conditioning system and wait for it to cool down; depending on the humidity, the output air should be 35 to 40 degrees cooler than the ambient air temperature
10. Further inspection or testing of the system requires special tools and techniques and is beyond the scope of the home mechanic.
Adding refrigerant
Caution: Make sure any refrigerant, refrigerant oil or replacement component you purchase is designated as compatible with R-134a systems.
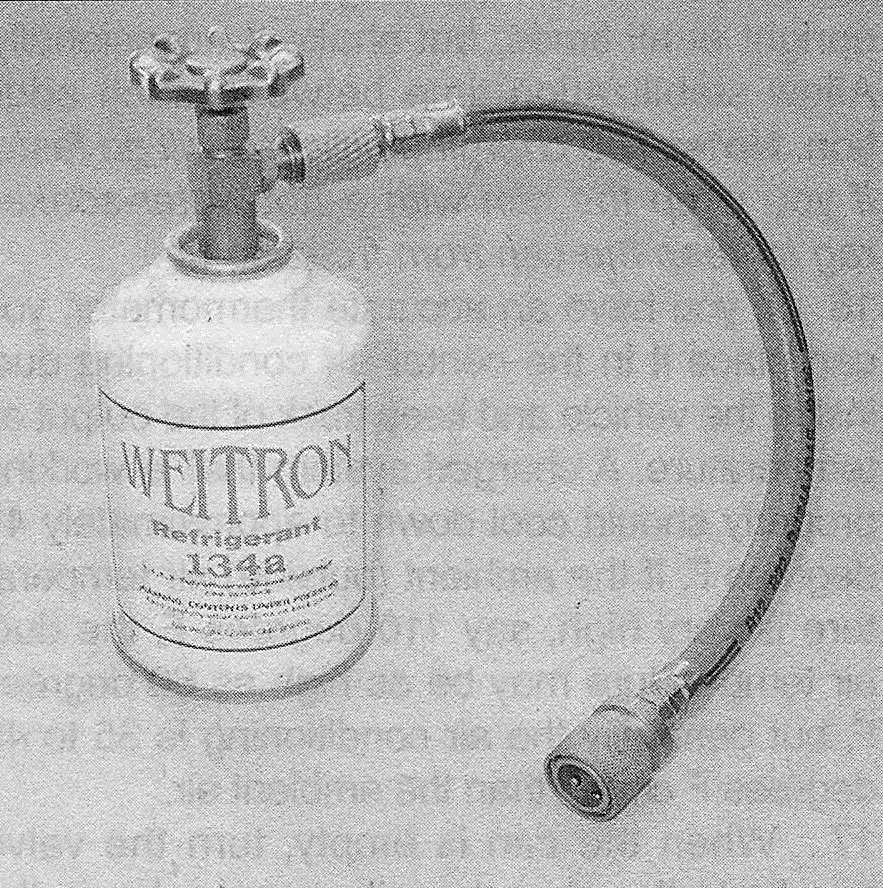
11. Purchase an R-134a automotive charging kit at an auto parts store (see illustration). A charging kit includes a can of refrigerant, a tap valve and a short section of hose that can be attached between the tap valve and the system low side service valve.
Caution: Never add more than one can of refrigerant to the system. If more refrigerant than that is required, the system should be evacuated and leak tested.
3.11 R-134a automotive air conditioning charging kit
12. Back off the valve handle on the charging kit and screw the kit onto the refrigerant can, making sure first that the 0-ring or rubber seal inside the threaded portion of the kit is in place.
Warning: Wear protective eyewear when dealing with pressurized refrigerant cans.
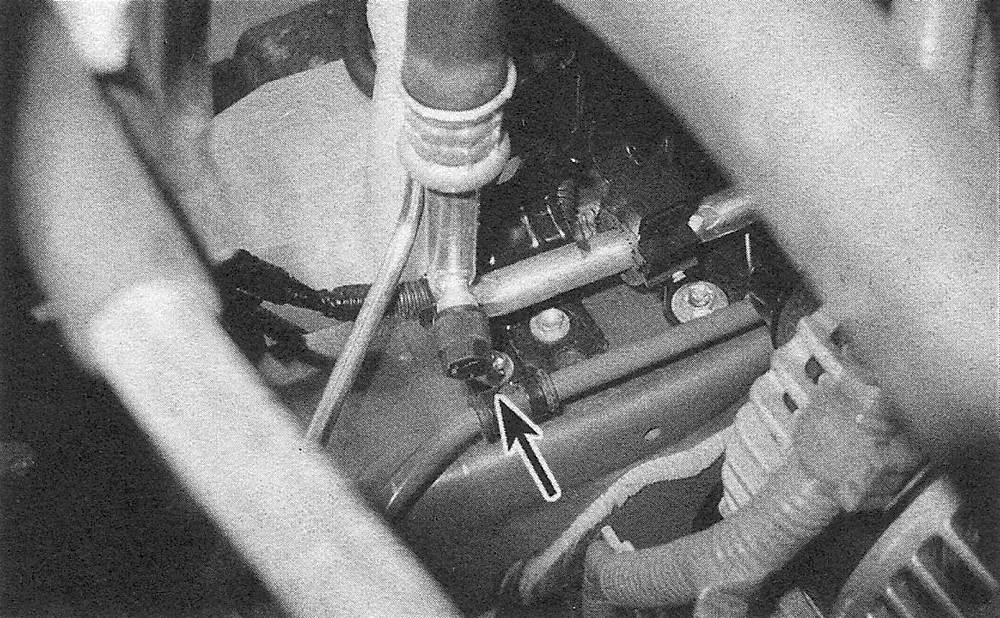
13. Remove the dust cap from the low-side charging port and attach the hose’s quick-connect fitting to the port (see illustration). Warning: DO NOT hook the charging kit hose to the system high side! The fittings on the charging kit are designed to fit only on the low side of the system.
3.13 Location of the low-side charging port ( in the right-front corner of the engine compartment
14. Warm up the engine and turn on the air conditioning. Keep the charging kit hose away from the fan and other moving parts. Note: The charging process requires the compressor to be running. If the clutch cycles off, you can put the air conditioning switch on High and leave the car doors open to keep the clutch on and compressor working. The compressor can be kept on during the charging by removing the connector from the pressure switch and bridging it with a paper clip or jumper wire during the procedure.
15. Turn the valve handle on the kit until the stem pierces the can, then back the handle out to release the refrigerant. You should be able to hear the rush of gas. Keep the can upright at all times, but shake it occasionally. Allow stabilization time between each addition. Note: The charging process will go faster if you wrap the can with a hot-water-soaked rag to keep the can from freezing up.
16. If you have an accurate thermometer, you can place it in the center air conditioning duct inside the vehicle and keep track of the output air temperature. A charged system that is working properly should cool down to approximately 40 degrees F. If the ambient (outside) air temperature is very high, say 110 degrees F, the duct air temperature may be as high as 60 degrees F, but generally the air conditioning is 35 to 40 degrees F cooler than the ambient air.
17. When the can is empty, turn the valve handle to the closed position and release the connection from the low-side port. Reinstall the dust cap.
18. Remove the charging kit from the can and store the kit for future use with the piercing valve in the UP position, to prevent inadvertently piercing the can on the next use.
Heating systems
19. If the carpet under the heater core is damp, or if antifreeze vapor or steam is coming through the vents, the heater core is leaking. Remove it (see Heater core — removal and installation) and install a new unit (most radiator shops will not repair a leaking heater core).
20. If the air coming out of the heater vents isn’t hot, the problem could stem from any of the following causes:
- ) The thermostat is stuck open, preventing the engine coolant from warming up enough to carry heat to the heater core. Replace the thermostat (see Thermostat — replacement).
- ) There is a blockage in the system, preventing the flow of coolant through the heater Feel both heater hoses at the firewall. They should be hot. If one of them is cold, there is an obstruction in one of the hoses or in the heater core, or the heater control valve is shut. Detach the hoses and back flush the heater core with a water hose. If the heater core is clear but circulation is impeded, remove the two hoses and flush them out with a water hose.
- ) If flushing fails to remove the blockage from the heater core, the core must be replaced (see Heater core — removal and installation).
Eliminating air conditioning odors
21. Unpleasant odors that often develop in air conditioning systems are caused by the growth of a fungus, usually on the surface of the evaporator core. The warm, humid environment there is a perfect breeding ground for mildew to develop.
22. The evaporator core on most vehicles is difficult to access, and factory dealerships have a lengthy, expensive process for eliminating the fungus by opening up the evaporate- for case and using a powerful disinfectant and rinse on the core until the fungus is gone. You can service your own system at home, but it takes something much stronger than basic household germ-killers or deodorizers.
23. Aerosol disinfectants for automotive air conditioning systems are available in most auto parts stores, but remember when shopping for them that the most effective treatments are also the most expensive. The basic procedure for using these sprays is to start by running the system in the RECIRC mode for ten minutes with the blower on its highest speed. Use the highest heat mode to dry out the system and keep the compressor from engaging by disconnecting the wiring connector at the compressor.
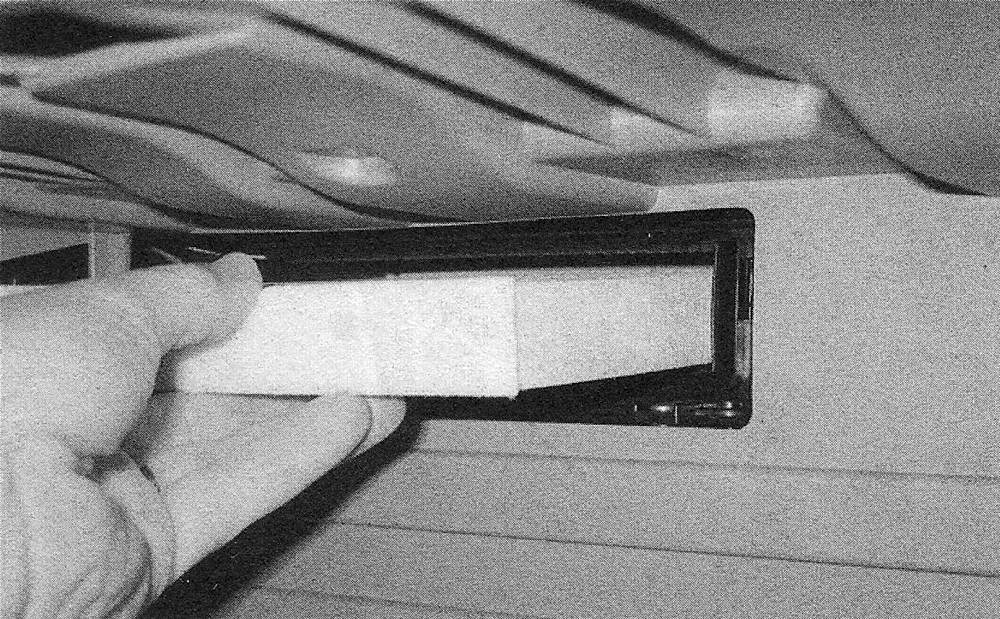
24. The disinfectant can usually come with a long spray hose. Insert the nozzle into an intake port inside the cabin, and spray according to the manufacturer’s recommendations (see illustration). Try to cover the whole surface of the evaporator core, by aiming the spray up, down and sideways. Follow the manufacturer’s recommendations for the length of spray and waiting time between applications.
3.24 Remove the cabin air filter (see Tune-up and routine maintenance) and insert the hose of the disinfectant can into the opening (don’t allow it to contact the blower fan)
25. Once the evaporator has been cleaned, the best way to prevent the mildew from coming back again is to make sure your evaporator housing drain tube is clear (see illustration 3.1).
Automatic heating and air conditioning systems
26. Some vehicles are equipped with an optional automatic climate control system. This system has its own computer that receives inputs from various sensors in the heating and air conditioning system. This computer, like the PCM, has self-diagnostic capabilities to help pinpoint problems or faults within the system. Vehicles equipped with automatic heating and air conditioning systems are very complex and considered beyond the scope of the home mechanic. Vehicles equipped with automatic heating and air conditioning systems should be taken to dealer service department or other qualified facility for repair.