Troubleshooting
Coolant leaks
1. A coolant leak can develop anywhere in the cooling system, but the most common causes are:
- ) A loose or weak hose clamp
- ) A defective hose
- ) A faulty pressure caps
- ) A damaged radiator
- ) A bad heater cores
- ) A faulty water pumps
- ) A leaking gasket at any joint that carries coolant
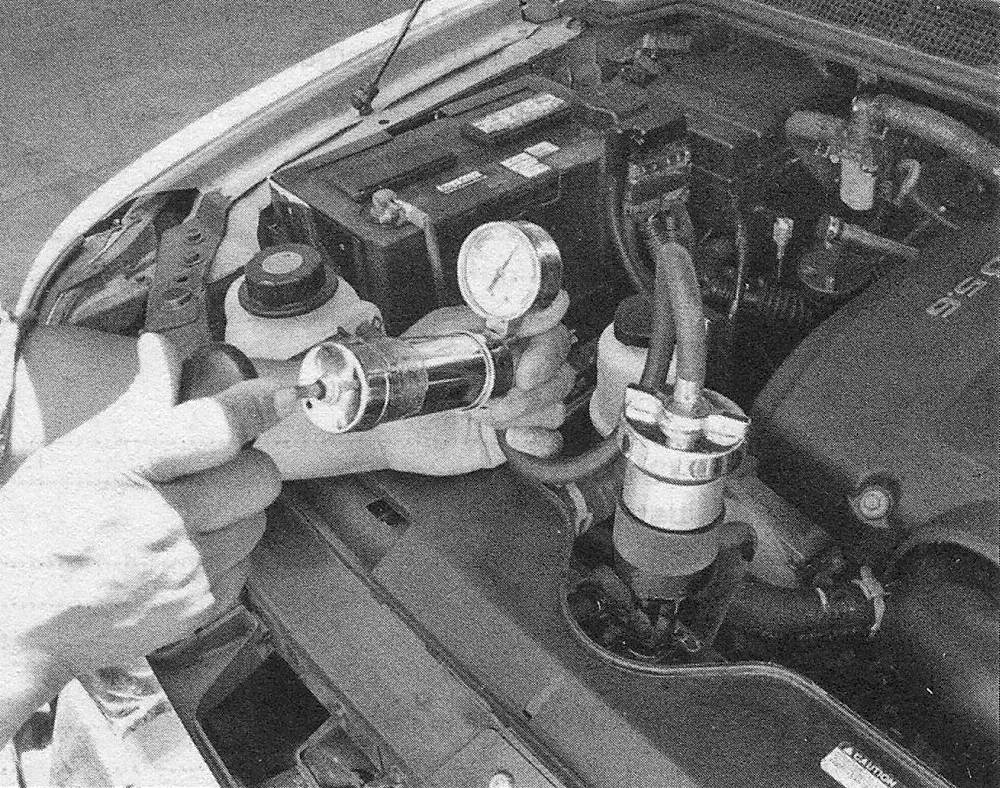
2. Coolant leaks aren’t always easy to find. Sometimes they can only be detected when the cooling system is under pressure. Here’s where a cooling system pressure tester comes in handy. After the engine has cooled completely, the tester is attached in place of the pressure cap, then pumped up to the pressure value equal to that of the pressure cap rating (see illustration). Now, leaks that only exist when the engine is fully warmed up will become apparent. The tester can be left connected to locate a nagging slow leak.
2.2 The cooling system pressure tester is connected in place of the pressure cap, then pumped up to pressurize the system
Coolant level drops, but no external leaks
3. If you find it necessary to keep adding coolant, but there are no external leaks, the probable causes include:
- ) A blown head gasket
- ) A leaking intake manifold gasket (only on engines that have coolant passages in the manifold)
- ) A cracked cylinder head or cylinder block
4. Any of the above problems will also usually result in contamination of the engine oil, which will cause it to take on a milkshake-like appearance. A bad head gasket or cracked head or block can also result in engine oil contaminating the cooling system.
5. Combustion leak detectors (also known as block testers) are available at most auto parts stores. These work by detecting exhaust gases in the cooling system, which indicates a compression leak from a cylinder into the coolant. The tester consists of a large bulb-type syringe and bottle of test fluid (see illustration). A measured amount of the fluid is added to the syringe. The syringe is placed over the cooling system filler neck and, with the engine running, the bulb is squeezed and a sample of the gases present in the cooling system are drawn up through the test fluid (see illustration). If any combustion gases are present in the sample taken, the test fluid will change color.
2.5a The combustion leak detector consists of a bulb, syringe and test fluid

2.5b Place the tester over the cooling system filler neck and use the bulb to draw a sample into the tester

6. If the test indicates combustion gas is present in the cooling system, you can be sure that the engine has a blown head gasket or a crack in the cylinder head or block, and will require disassembly to repair.
Pressure cap
Warning: Wait until the engine is completely cool before beginning this check.
7. The cooling system is sealed by a spring-loaded cap, which raises the boiling point of the coolant. If the cap’s seal or spring are worn out, the coolant can boil and escape past the cap. With the engine completely cool, remove the cap and check the seal; if it’s cracked, hardened or deteriorated in any way, replace it with a new one.
8. Even if the seal is good, the spring might not be; this can be checked with a cooling system pressure tester (see illustration). If the cap can’t hold a pressure within approximately 1-1/2 lbs. of its rated pressure (which is marked on the cap), replace it with a new one.
2.8 Check the cooling system pressure cap with a cooling system pressure tester

9. The cap is also equipped with a vacuum relief spring. When the engine cools off, a vacuum is created in the cooling system. The vacuum relief spring allows air back into the system, which will equalize the pressure and prevent damage to the radiator (the radiator tanks could collapse if the vacuum is great enough). If, after turning the engine off and allowing it to cool down you notice any of the cooling system hoses collapsing, replace the pressure cap with a new one.
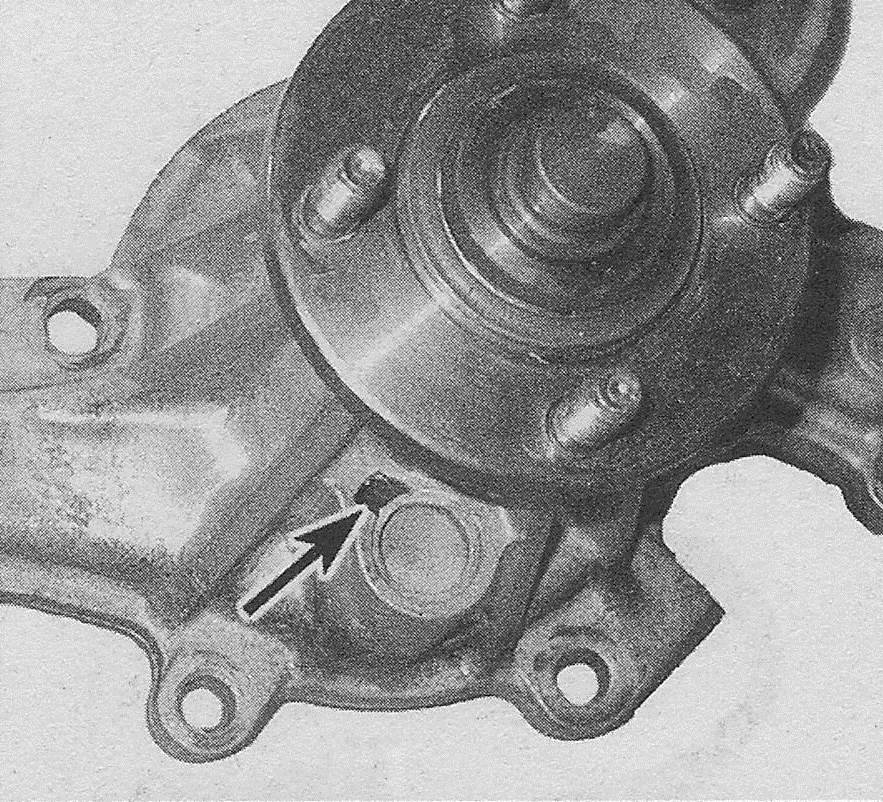
Thermostat
10. Before assuming the thermostat (see illustration) is responsible for a cooling system problem, check the coolant level (see Tune-up and routine maintenance), drivebelt tension (see Tune-up and routine maintenance) and temperature gauge (or light) operation.
2.10 Typical thermostat:
1 Flange
2 Piston
3 Jiggle valve
4 Main coil spring
5 Valve seat
6 Valve
7 Frame
8 Secondary coil spring

11. If the engine takes a long time to warm up (as indicated by the temperature gauge or heater operation), the thermostat is probably stuck open. Replace the thermostat with a new one.
12. If the engine runs hot or overheats, a thorough test of the thermostat should be performed.
13. Definitive testing of the thermostat can only be made when it is removed from the vehicle. If the thermostat is stuck in the open position at room temperature, it is faulty and must be replaced.
Caution: Do not drive the vehicle without a thermostat. The computer may stay in open loop and emissions and fuel economy will suffer.
14. To test a thermostat, suspend the (closed) thermostat on a length of string or wire in a pot of cold water.
15. Heat the water on a stove while observing thermostat. The thermostat should fully open before the water boils.
16. If the thermostat doesn’t open and close as specified, or sticks in any position, replace it.
Cooling fan Electric cooling fan
17. If the engine is overheating and the cooling fan is not coming on when the engine temperature rises to an excessive level, unplug the fan motor electrical connector (s) and connect the motor directly to the battery with fused jumper wires. If the fan motor doesn’t come on, replace the motor.
18. If the radiator fan motor is okay, but it isn’t coming on when the engine gets hot, the fan relay might be defective. A relay is used to control a circuit by turning it on and off in response to a control decision by the Powertrain Control Module (PCM). These control circuits are fairly complex, and checking them should be left to a qualified automotive technician. Sometimes, the control system can be fixed by simply identifying and replacing a bad relay.
19. Locate the fan relays in the engine compartment fuse/relay box.
20. Test the relay (see Chassis electrical system).
21. If the relay is okay, check all wiring and connections to the fan motor. Refer to the wiring diagrams at the end of Chapter Chassis electrical system. If no obvious problems are found, the problem could be the Engine Coolant Temperature (ECT) sensor or the Powertrain Control Module (PCM). Have the cooling fan system and circuit diagnosed by a dealer service department or repair shop with the proper diagnostic equipment. Note: These models are equipped with a cooling fan motor resistor. Have the resistor checked if the fan motor does not respond to the speed variations signaled by the PCM.
Belt -driven cooling fan
22. Disconnect the cable from the negative terminal of the battery and rock the fan back and forth by hand to check for excessive bearing play.
23. With the engine cold (and not running), turn the fan blades by hand. The fan should turn freely.
24. Visually inspect for substantial fluid leakage from the clutch assembly. If problems are noted, replace the clutch assembly.
25. With the engine completely warmed up, turn off the ignition switch and disconnect the negative battery cable from the battery. Turn the fan by hand. Some drag should be evident. If the fan turns easily, replace the fan clutch.
Water pump
26. A failure in the water pump can cause serious engine damage due to overheating.
Drivebelt -driven water pump
27. There are two ways to check the operation of the water pump while it’s installed on the engine. If the pump is found to be defective, it should be replaced with a new or rebuilt unit.
28. Water pumps are equipped with weep (or vent) holes (see illustration). If a failure occurs in the pump seal, coolant will leak from the hole.
2.28 The water pump weep hole is generally located on the underside of the pump
29. If the water pump shaft bearings fail, there may be a howling sound at the pump while it’s running. Shaft wear can be felt with the drivebelt removed if the water pump pulley is rocked up and down (with the engine off). Don’t mistake drivebelt slippage, which causes a squealing sound, for water pump bearing failure.
Timing chain or timing belt-driven water pump
30. Water pumps driven by the timing chain or timing belt are located underneath the timing chain or timing belt cover.
31. Checking the water pump is limited because of where it is located. However, some basic checks can be made before deciding to remove the water pump. If the pump is found to be defective, it should be replaced with a new or rebuilt unit.
32. One sign that the water pump may be failing is that the heater (climate control) may not work well. Warm the engine to normal operating temperature, confirm that the coolant level is correct, then run the heater and check for hot air coming from the ducts.
33. Check for noises coming from the water pump area. If the water pump impeller shaft or bearings are failing, there may be a howling sound at the pump while the engine is running.
Note: Be careful not to mistake drivebelt noise (squealing) for water pump bearing or shaft failure.
34. It you suspect water pump failure due to noise, wear can be confirmed by feeling for play at the pump shaft. This can be done by rocking the drive sprocket on the pump shaft up and down. To do this you will need to remove the tension on the timing chain or belt as well as access the water pump.
All water pumps
35. In rare cases or on high-mileage vehicles, another sign of water pump failure may be the presence of coolant in the engine oil. This condition will adversely affect the engine in varying degrees. Note: Finding coolant in the engine oil could indicate other serious issues besides a failed water pump, such as a blown head gasket or a cracked cylinder head or block
36. Even a pump that exhibits no outward signs of a problem, such as noise or leakage, can still be due for replacement. Removal for close examination is the only sure way to tell. Sometimes the fins on the back of the impeller can corrode to the point that cooling efficiency is diminished significantly.
Heater system
37. Little can go wrong with a heater. If the fan motor will run at all speeds, the electrical part of the system is okay. The three basic heater problems fall into the following general categories:
- ) Not enough heat
- ) Heat all the time
- ) No heat
38. If there’s not enough heat, the control valve or door is stuck in a partially open position, the coolant coming from the engine isn’t hot enough, or the heater core is restricted. If the coolant isn’t hot enough, the thermostat in the engine cooling system is stuck open, allowing coolant to pass through the engine so rapidly that it doesn’t heat up quickly enough. If the vehicle is equipped with a temperature gauge instead of a warning light, watch to see if the engine temperature rises to the normal operating range after driving for a reasonable distance.
39. If there’s heat all the time, the control valve or the door is stuck wide open.
40. If there’s no heat, coolant is probably not reaching the heater core, or the heater core is plugged. The likely cause is a collapsed or plugged hose, core, or a frozen heater control valve. If the heater is the type that flows coolant all the time, the cause is a stuck door or a broken or kinked control cable.
Air conditioning system
41. If the cool air output is inadequate:
- ) Inspect the condenser coils and fins to make sure they’re clear
- ) Check the compressor clutch for slip
- ) Check the blower motor for proper operation.
- ) Inspect the blower discharge passage for obstructions.
- ) Check the system air intake filter for
42. If the system provides intermittent cooling air:
- ) Check the circuit breaker, blower switch and blower motor for a malfunction.
- ) Make sure the compressor clutch isn’t
- ) Inspect the plenum door to make sure it’s operating properly.
- ) Inspect the evaporator to make sure it isn’t clogged.
- ) If the unit is icing up, it may be caused by excessive moisture in the system, incorrect super heat switch adjustment or low thermostat adjustment.
43. If the system provides no cooling air:
- ) Inspect the compressor drivebelt. Make sure it’s not loose or broken.
- ) Make sure the compressor clutch If it doesn’t, check for a blown fuse.
- ) Inspect the wire harness for broken or disconnected wires.
- ) If the compressor clutch doesn’t engage, bridge the terminals of the A/C pressure switch (es) with a jumper wire; if the clutch now engages, and the system is properly charged, the pressure switch is
- ) Make sure the blower motor is not disconnected or burned out.
- ) Make sure the compressor isn’t partially or completely seized.
- ) Inspect the refrigerant lines for leaks.
- ) Check the components for leaks.
- ) Inspect the receiver-drier/accumulator or expansion valve/tube for clogged
44. If the system is noisy:
- ) Look for loose panels in the passenger
- ) Inspect the compressor drivebelt. It may be loose or worn.
- ) Check the compressor mounting bolts. They should be tight.
- ) Listen carefully to the compressor. It may be worn out.
- ) Listen to the idler pulley and bearing and the clutch. Either may be defective.
- ) t) The winding in the compressor clutch coil or solenoid may be defective.
- ) The compressor oil level may be low.
- ) The blower motor fan bushing or the motor itself may be worn out.
- ) If there is an excessive charge in the system, you’ll hear a rumbling noise in the high pressure line, a thumping noise in the compressor, or see bubbles or cloudiness in the sight glass.
- ) If there’s a low charge in the system, you might hear hissing in the evaporator case at the expansion valve, or see bubbles or cloudiness in the sight glass.