Troubleshooting
1. If a malfunction occurs in the ignition system, do not immediately assume that any particular part is causing the problem. First, check the following items:
- ) Make sure that the cable clamps at the battery terminals are clean and tight.
- ) Test the condition of the battery (see Steps 21 through 24). If it doesn’t pass all the tests, replace it.
- ) Check the ignition coil or coil pack con
- ) Check any relevant fuses in the engine compartment fuse and relay box (see Chassis electrical system). If they’re burned, determine the cause and repair the circuit.
Check
Warning: Because of the high voltage generated by the ignition system, use extreme care when performing a procedure involving ignition components.
Note 1: The ignition system components on these vehicles are difficult to diagnose. In the event of ignition system failure that you can’t diagnose, have the vehicle tested at a dealer service department or other qualified auto repair facility.
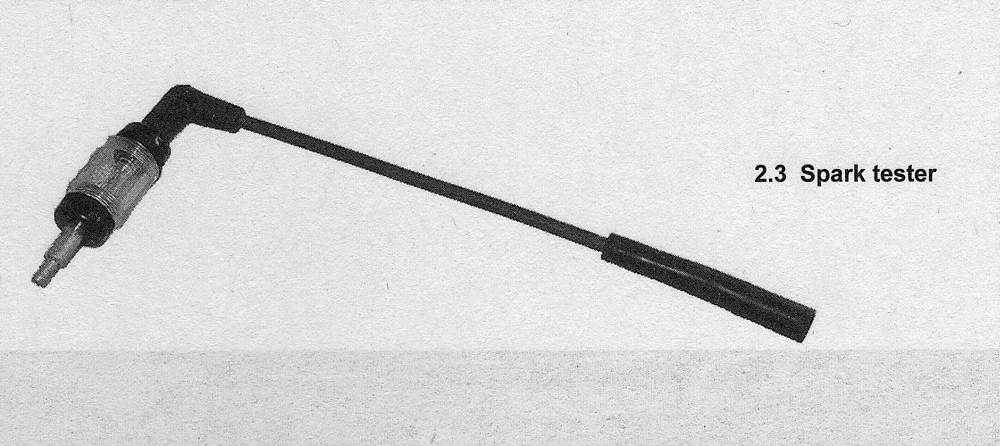
Note 2: You’ll need a spark tester for the following test. Spark testers are available at most auto supply stores.
2. If the engine turns over but won’t start, verify that there is sufficient ignition voltage to fire the spark plugs as follows.
3. On models with a coil over-plug type ignition system, remove a coil and install the tester between the boot at the lower end of the coil and the spark plug (see illustration). On models with spark plug wires, disconnect a spark plug wire from a spark plugs and install the tester between the spark plug wire boot and the spark plug.
2.3 Spark tester
4. Crank the engine and note whether or not the tester flashes. Caution: Do NOT crank the engine or allow it to run for more than five seconds; running the engine for more than five seconds may set a Diagnostic Trouble Code (DTC) for a cylinder misfire.
Models with a coil-over-plug type ignition system
5. If the tester flashes during cranking, the coil is delivering sufficient voltage to the spark plug to fire it. Repeat this test for each cylinder to verify that the other coils are OK.
6. If the tester doesn’t flash, remove a coil from another cylinder and swap it for the one being tested. If the tester now flashes, you know that the original coil is bad. If the tester still doesn’t flash, the PCM or wiring harness is probably defective. Have the PCM checked out by a dealer service department or other qualified repair shop (testing the PCM is beyond the scope of the do-it-yourselfer because it requires expensive special tools).
7. If the tester flashes during cranking but a misfire code (related to the cylinder being tested) has been stored, the spark plug could be fouled or defective. Models with spark plug wires
8. If the tester flashes during cranking, sufficient voltage is reaching the spark plug to fire it.
9. Repeat this test on the remaining cylinders.
10. Proceed on this basis until you have verified that there’s a good spark from each spark plug wire. If there is, then you have verified that the coils in the coil pack are functioning correctly and that the spark plug wires are OK.
11. If there is no spark from a spark plug wire, then either the coil is bad, the plug wire is bad or a connection at one end of the plug wire is loose. Assuming that you’re using new plug, wires or known good wires, then the coil is probably defective. Also inspect the coil pack electrical connector. Make sure that it’s clean, tight and in good condition.
12. If all the coils are firing correctly, but the engine misfires, then one or more of the plugs might be fouled. Remove and check the spark plugs or install new ones (see Tune-up and routine maintenance).
13. No further testing of the ignition system is possible without special tools. If the problem persists, have the ignition system tested by a dealer service department or other qualified repair shop.
Charging system
14. If a malfunction occurs in the charging system, do not automatically assume the alternator is causing the problem. First check the following items:
- ) Check the drivebelt tension and condition, as described in Chapter 1. Replace it if it’s worn or deteriorated.
- ) Make sure the alternator mounting bolts are tight.
- ) Inspect the alternator wiring harness and the connectors at the alternator and voltage regulator. They must be in good condition, tight and have no corrosion.
- ) Check the fusible link (if equipped) or main fuse in the under-hood fuse/relay If it is burned, determine the cause, repair the circuit and replace the link or fuse (the vehicle will not start and/or the accessories will not work if the fusible link or main fuse is blown).
- ) Start the engine and check the alternator for abnormal noises (a shrieking or squealing sound indicates a bad bearing).
- ) t) Check the battery. Make sure it’s fully charged and in good condition (one bad cell in a battery can cause overcharging by the alternator).
- ) g) Disconnect the battery cables (negative first, then positive). Inspect the battery posts and the cable clamps for corro Clean them thoroughly if necessary (see Tune-up and routine maintenance). Reconnect the cables (positive first, negative last).
Alternator — check
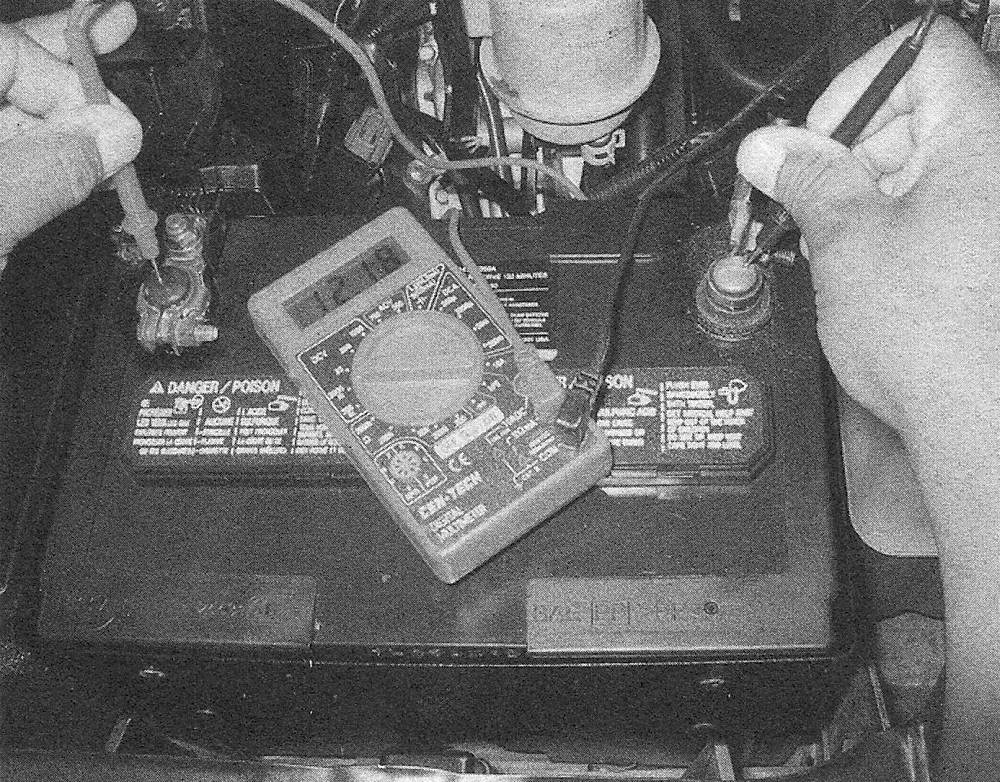
15. Use a voltmeter to check the battery voltage with the engine off. It should be at least 12.6 volts (see illustration 2.21).
16. Start the engine and check the battery voltage again. It should now be approximately 13.5 to 15 volts.
17. If the voltage reading is more or less than the specified charging voltage, the voltage regulator is probably defective, which will require replacement of the alternator (the voltage regulator is not replaceable separately). Remove the alternator and have it bench tested (most auto parts stores will do this for you).
18. The charging system (battery) light on the instrument cluster lights up when the ignition key is turned to ON, but it should go out when the engine starts.
19. If the charging system light stays on after the engine has been started, there is a problem with the charging system. Before replacing the alternator, check the battery condition, alternator belt tension and electrical cable connections.
20. If replacing the alternator doesn’t restore voltage to the specified range, have the charging system tested by a dealer service department or other qualified repair shop.
Battery — check
21. Check the battery state of charge. Visually inspect the indicator eye on the top of the battery (if equipped with one); if the indicator eye is black in color, charge the battery as described in Chapter Tune-up and routine maintenance. Next perform an open circuit voltage test using a digital voltmeter. Note: The battery’s surface charge must be removed before accurate voltage measurements can be made. Turn on the high beams for ten seconds, then turn them off and let the vehicle stand for two minutes. With the engine and all accessories Off, touch the negative probe of the voltmeter to the negative terminal of the battery and the positive probe to the positive terminal of the battery (see illustration). The battery voltage should be 12.6 volts or slightly above. If the battery is less than the specified voltage, charge the battery before proceeding to the next test. Do not proceed with the battery load test unless the battery charge is correct.
2.21 To test the open circuit voltage of the battery, touch the black probe of the voltmeter to the negative terminal and the red probe to the positive terminal of the battery; a fully charged battery should be at least 12.6 volts
22. Disconnect the negative battery cable, then the positive cable from the battery.
23. Perform a battery load test. An accurate check of the battery condition can only be performed with a load tester (see illustration). This test evaluates the ability of the battery to operate the starter and other accessories during periods of high current draw. Connect the load tester to the battery terminals. Load test the battery according to the tool manufacturer’s instructions. This tool increases the load demand (current draw) on the battery.
2.23 Connect a battery load tester to the battery and check the battery condition under load following the tool manufacturer’s instructions
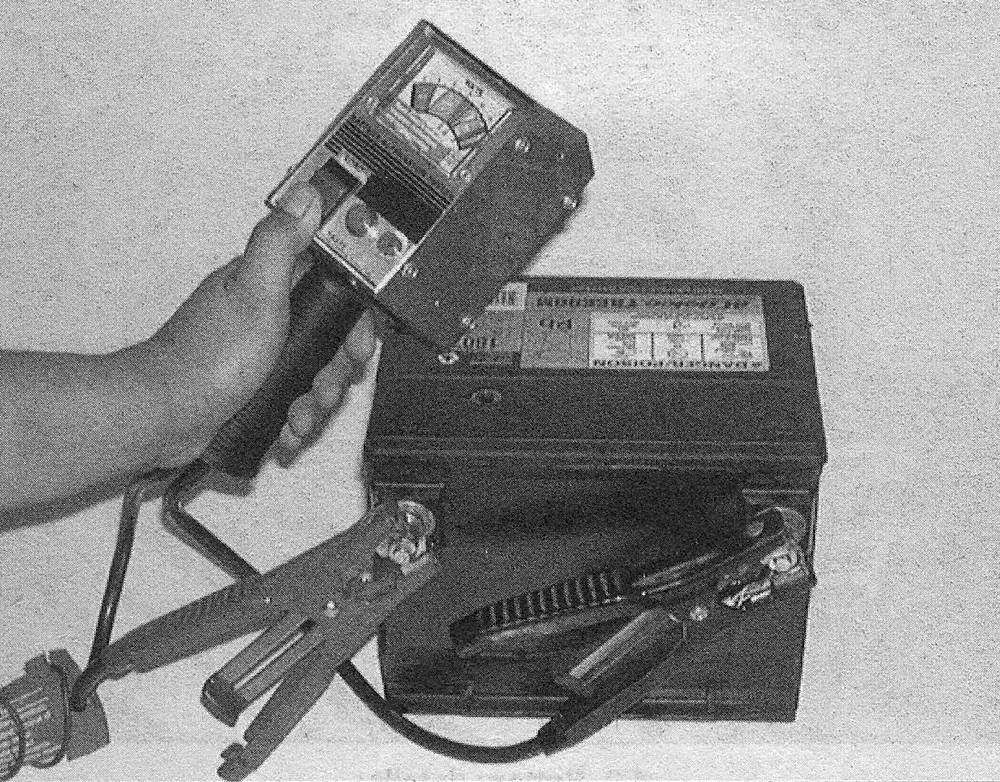
24. Maintain the load on the battery for 15 seconds and observe that the battery voltage does not drop below 9.6 volts. If the battery condition is weak or defective, the
tool will indicate this condition immediately. Note: Cold temperatures will cause the minimum voltage reading to drop slightly. Follow the chart given in the manufacturer’s instructions to compensate for cold climates. Minimum load voltage for freezing temperatures (32 degrees F) should be approximately 9.1 volts.
Starting system
The starter rotates, but the engine doesn’t
25. Remove the starter (see Starter motor — removal and installation). Check the overrunning clutch and bench test the starter to make sure the drive mechanism extends fully for proper engagement with the flywheel ring gear. If it doesn’t, replace the starter.
26. Check the flywheel ring gear for missing teeth and other damage. With the ignition turned off, rotate the flywheel so you can check the entire ring gear.
The starter is noisy
27. If the solenoid is making a chattering noise, first check the battery (see Steps 21 through 24). If the battery is okay, check the cables and connections.
28. If you hear a grinding, crashing metallic sound when you turn the key to Start, check for loose starter mounting bolts. If they’re tight, remove the starter and inspect the teeth on the starter pinion gear and flywheel ring gear. Look for missing or damaged teeth.
29. If the starter sounds fine when you first turn the key to Start, but then stops rotating the engine and emits a zinging sound, the problem is probably a defective starter drive that’s not staying engaged with the ring gear. Replace the starter.
The starter rotates slowly
30. Check the battery (see Steps 21 through 24).
31. If the battery is okay, verify all connections (at the battery, the starter solenoid and motor) are clean, corrosion-free and tight. Make sure the cables aren’t frayed or damaged.
32. Check that the starter mounting bolts are tight so it grounds properly. Also check the pinion gear and flywheel ring gear for evidence of a mechanical bind (galling, deformed gear teeth or other damage).
The starter does not rotate at all
33. Check the battery (see Steps 21 through 24).
34. If the battery is okay, verify all connections (at the battery, the starter solenoid and motor) are clean, corrosion-free and tight. Make sure the cables aren’t frayed or damaged.
35. Check all of the fuses in the under-hood fuse/relay box.
36. Check that the starter mounting bolts are tight so it grounds properly.
37. Check for voltage at the starter solenoid «S» terminal when the ignition key is turned to the start position. If voltage is present, replace the starter/solenoid assembly. If no voltage is present, the problem could be the starter relay, the Transmission Range (TR) switch (see Emissions and engine control systems) or clutch start switch (see Clutch and driveaxles), or with an electrical connector somewhere in the circuit (see the wiring diagrams at the end of Chapter Chassis electrical system). Also, on many modern vehicles, the Powertrain Control Module (PCM) and the Body Control Module (BCM) control the voltage signal to the starter solenoid; on such vehicles a special scan tool is required for diagnosis.