Cylinder head — removal and installation
Warning: The engine must be completely cool before beginning this procedure
Caution: New cylinder head bolts should be used when installing the cylinder head.
Note: If you’re working on a 2010 or later model, the manufacturer recommends removing the engine and transaxle assembly to perform this procedure.
Removal
1. Relieve the fuel system pressure (see Fuel and exhaust systems), then disconnect the cable from the negative terminal of the battery.
2. Drain the engine coolant (see Tune-up and routine maintenance).
3. Remove the drivebelt and the alternator (see Engine electrical systems).
4. Remove the valve cover (see Valve cover — removal and installation).
5. Remove the throttle body, fuel injectors and fuel rail (see Fuel and exhaust systems).
6. Remove the intake manifold (see Intake manifold — removal and installation).
7. Remove the exhaust manifold (see Exhaust manifold — removal and installation).
8. Remove the timing chain and camshaft sprockets (see Timing chain and sprockets — removal, inspection and installation).
9. On 2010 and later models, remove the camshafts, lifters and camshaft housing (see Camshafts and lifters — removal, inspection and installation).
10. Remove the variable valve timing control valve (see illustration 5.2a or 5.2b).
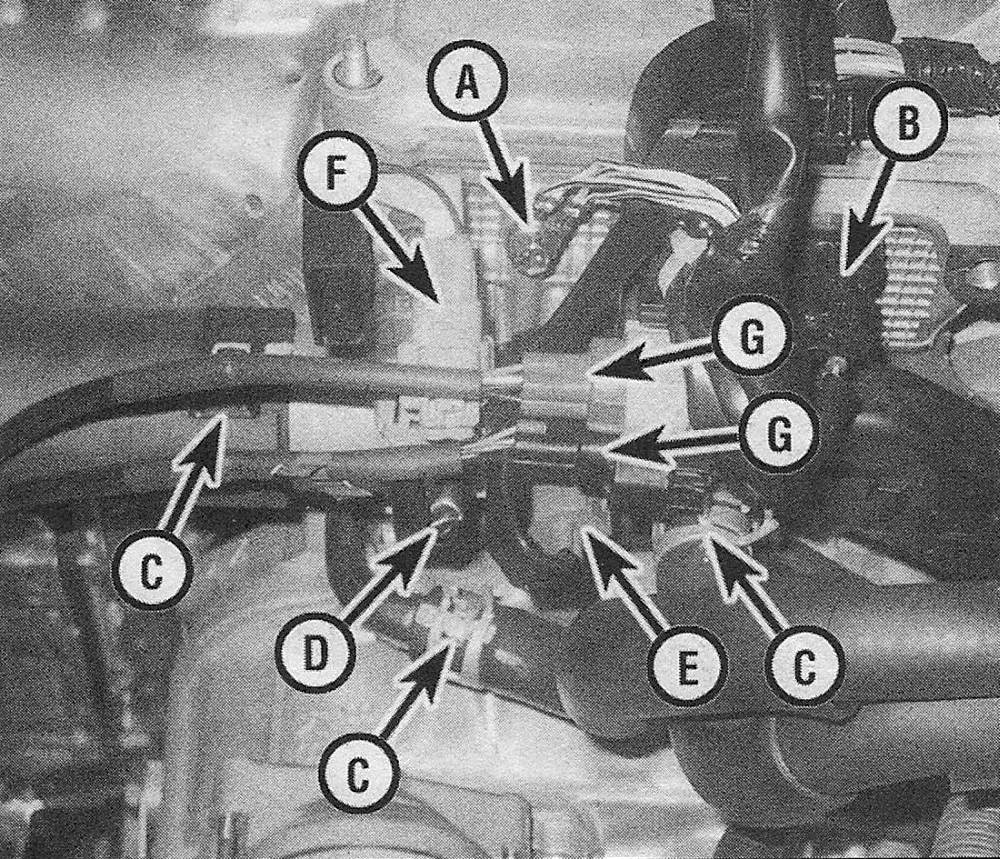
11. Label and remove the coolant hoses and electrical connections from the cylinder head (see illustration).
10.11 Disconnect the following components from the driver’s side of the cylinder head and position the electrical wiring harness aside — 2009 and earlier models shown
A Ground straps
B Camshaft position sensor
C Coolant hoses
D Oil pressure sending unit
E Coolant temperature sensor
F Radio noise suppressor
G Oxygen sensor connector
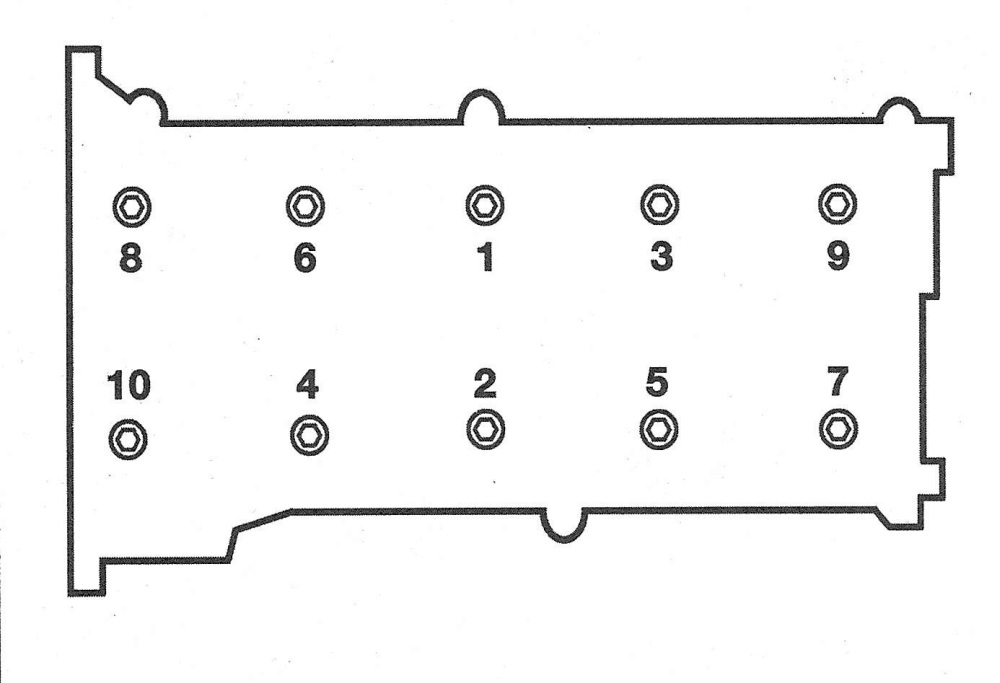
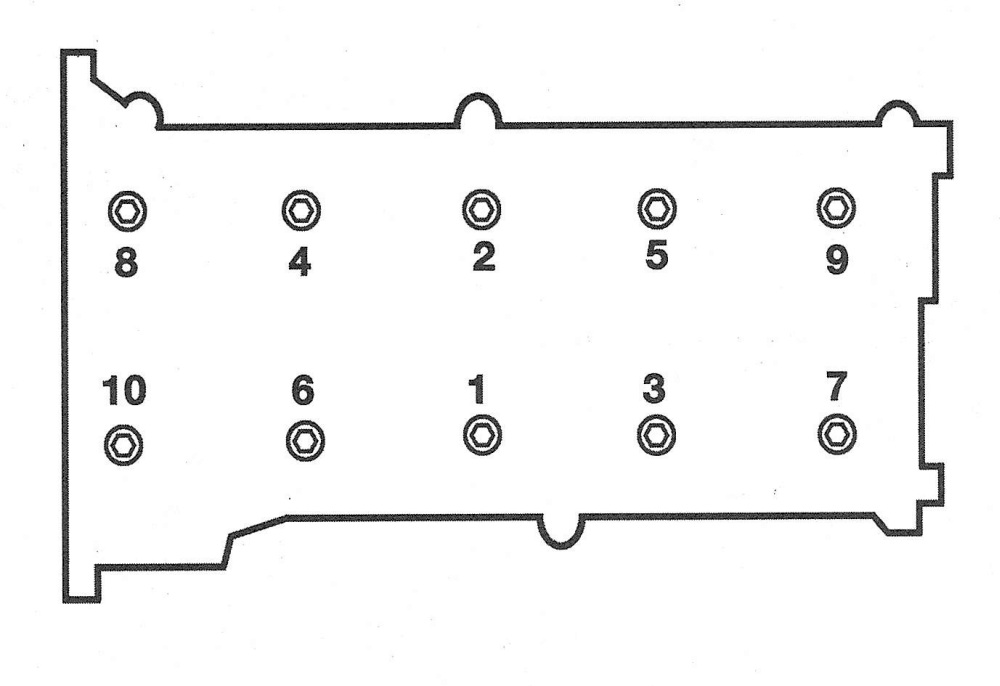
12. Using a 10 mm hex-head socket bit and a breaker bar, loosen the cylinder head bolts in 1/4-turn increments until they can be removed by hand. Loosen the cylinder head bolts in the reverse order of the recommended tightening sequence (see illustration 10.24a or 10.24b) to avoid warping or cracking the cylinder head.
13. Lift the cylinder head off the engine block. If it’s stuck, very carefully pry up at the transaxle end, beyond the gasket.
14. Remove any remaining external components from the cylinder head to allow for thorough cleaning and inspection.
Installation
15. The mating surfaces of the cylinder head and block must be perfectly clean when the cylinder head is installed.
16. Use a gasket scraper to remove all traces of carbon and old gasket material, then clean the mating surfaces with brake system cleaner. If there’s oil on the mating surfaces when the cylinder head is installed, the gasket may not seal correctly and leaks could develop. When working on the block, stuff the cylinders with clean shop rags to keep out debris.
17. Use a vacuum cleaner to remove material that falls into the cylinders.
18. Check the block and cylinder head mating surfaces for nicks, deep scratches and other damage. If damage is slight, it can be removed with a file; if it’s excessive, machining may be the only alternative.
19. Use a tap of the correct size to chase the threads in the cylinder head bolt holes, then clean the holes with compressed air — make sure that nothing remains in the holes.
Warn ing: Wear eye protection when using compressed air!
20. Install the components that were removed from the cylinder head.
21. Position the new gasket over the dowel pins in the block, then apply RTV sealant to the ends of the cylinder head gasket on the timing chain cover side.
22. Carefully set the cylinder head on the block without disturbing the gasket.
23. Before installing the cylinder head bolts, apply a small amount of clean engine oil to the threads and under the bolt heads.
24. Install the new cylinder head bolts and tighten them finger tight. Following the recommended sequence, tighten the bolts to the torque listed in this Chapter’s Specifications (see illustrations).
10.24a Cylinder head bolt TIGHTENING sequence 2009 and earlier models
10.24b Cylinder head bolt TIGHTENING sequence 2010 and later models
25. The remainder of installation is the reverse of removal.
Caution: Wait at least four hours before adding oil and coolant and starting the engine.
26. On 2009 and earlier models, check and adjust the valves as necessary (see Tune-up and routine maintenance).
27. Change the engine oil and filter (see Tune-up and routine maintenance).
28. Refill the cooling system (see Tune-up and routine maintenance), run the engine and check for leaks.