Engine oil and oil filter change
1. Frequent oil changes are the best preventive maintenance the home mechanic can give the engine, because aging oil becomes diluted and contaminated, which leads to premature engine wear.
2. Make sure that you have all the necessary tools before you begin this procedure (see illustration). You should also have plenty of rags or newspapers handy for mopping up any spills.
6.2 These tools are required when changing the engine oil and filter
1. Drain pan — It should be fairly shallow in depth, but wide to prevent spills
2. Rubber gloves — When removing the drain plug and filter, you will get oil on your hands (the gloves will prevent burns)
3. Breaker bar — Sometimes the oil drain plug is tight, and a long breaker bar is needed to loosen it
4. Socket — To be used with the breaker bar or a ratchet (must be the correct size to fit the drain plug)
5. Filter wrench — This is a metal band-type wrench, which requires clearance around the filter to be effective
6. Filter wrench — This type fits on the bottom of the filter and can be turned with a ratchet or breaker bar (different size wrenches are available for different types of filters)

3. Park the vehicle on a level spot. Start the engine and allow it to reach its normal operating temperature (the needle on the temperature gauge should be at least above the bottom mark). Warm oil and sludge will flow out more easily. Turn off the engine when it’s warmed up.
4. Remove the filler cap in the rear cam cover.
5. Raise the vehicle and support it securely on jack stands.
Warning: To avoid personal injury, never get beneath the vehicle when it is supported by only by a jack. The jack provided with your vehicle is designed solely for raising the vehicle to remove and replace the wheels. Always use jack stands to support the vehicle when it becomes necessary to place your body underneath the vehicle.
6. If this is your first oil change, get under the vehicle and familiarize yourself with the location of the oil drain plug. The engine and exhaust components will be warm during the actual work, so try to anticipate any potential problems before the engine and accessories are hot.
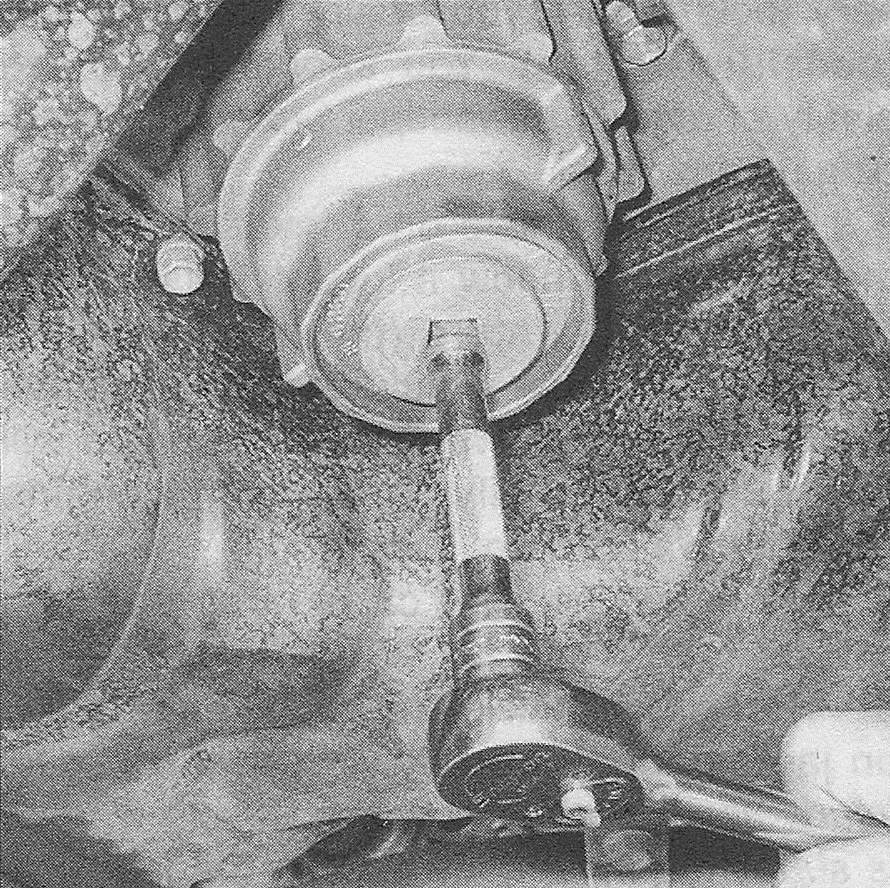
7. Being careful not to touch the hot exhaust components, place the drain pan under the drain plug in the bottom of the pan and remove the plug (see illustration). You may want to wear gloves while unscrewing the plug the final few turns if the engine is really hot.
6.7 Use the proper size box-end wrench or socket to remove the oil drain plug without rounding off the corners
8. Allow the old oil to drain into the pan. It may be necessary to move the pan farther under the engine as the oil flow slows to a trickle. Inspect the old oil for the presence of metal shavings and chips.
9. After all the oil has drained, wipe off the drain plug with a clean rag. Even minute metal particles clinging to the plug would immediately contaminate the new oil.
10. Clean the area around the drain plug opening, reinstall the plug and tighten it to the torque listed in this Chapter’s Specifications.
11. Move the drain pan into position under the oil filter.
2009 and earlier four-cylinder models
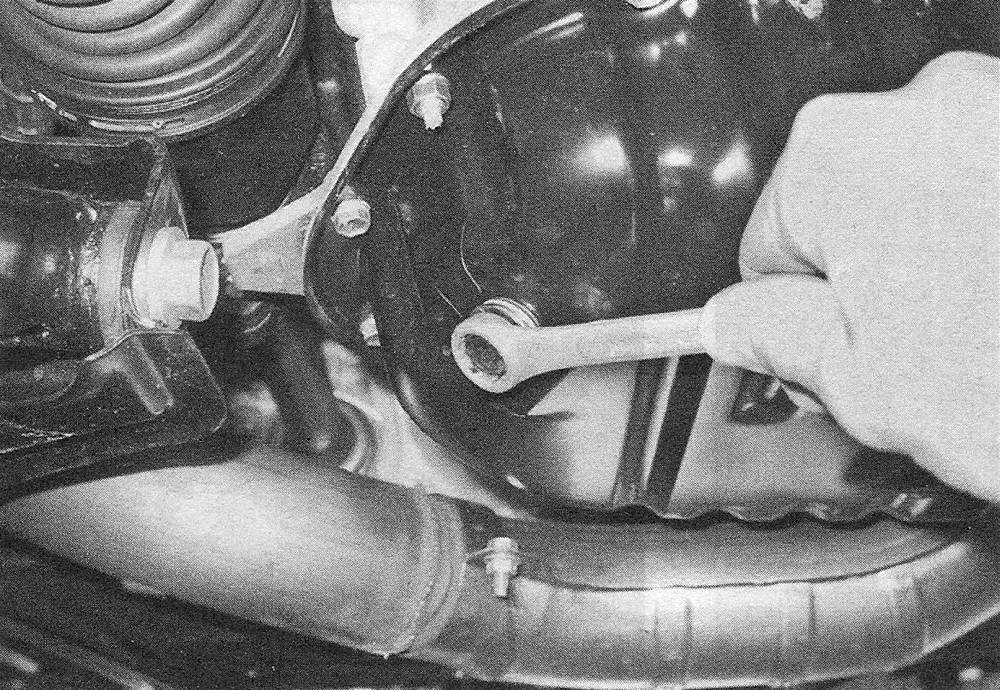
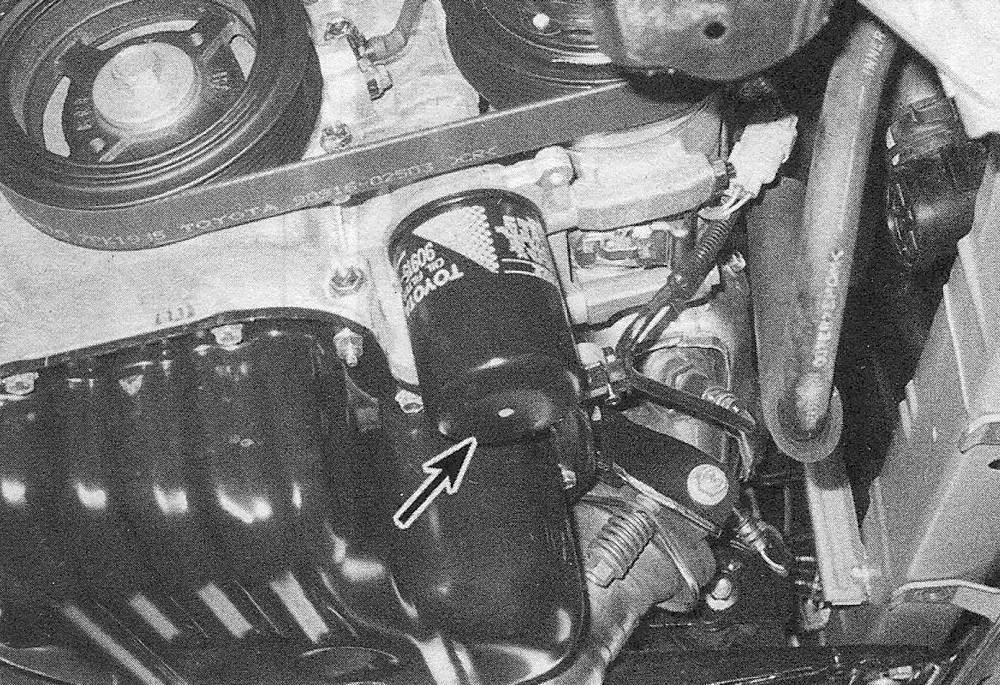
12. Loosen the oil filter (see illustration) by turning it counterclockwise with the filter wrench. Any standard filter wrench should work. Once the filter is loose, use your hands to unscrew it from the block. Just as the filter is detached from the block, immediately tilt the open end up to prevent the oil inside the filter from spilling out.
6.12 Location of the oil filter on 2009 and earlier four-cylinder models
Warning: The engine exhaust manifold may still be hot, so be careful.
13. With a clean rag, wipe off the mounting surface on the block. If a residue of old oil is allowed to remain, it will smoke when the block is heated up. It will also prevent the new filter from seating properly. Also make sure that none of the old gasket remains stuck to the mounting surface. It can be removed with a scraper if necessary.
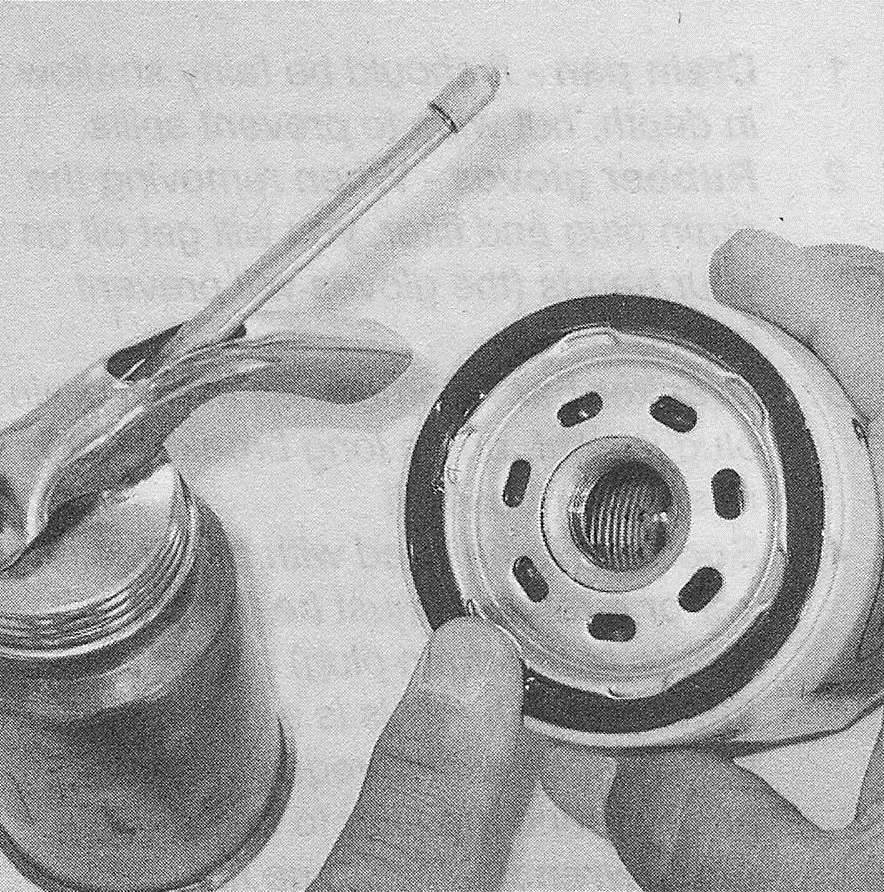
14. Compare the old filter with the new one to make sure they are the same type. Smear some engine oil on the rubber gasket of the new filter and screw it into place (see illustra tion).
6.14 Lubricate the oil filter gasket with clean engine oil before installing the filter on the engine
15. Because over-tightening the filter will damage the gasket, do not use a filter wrench to tighten the filter. Tighten it by hand until the gasket contacts the seating surface, then seat the filter by giving it an additional 3/4-turn. Lower the vehicle and proceed to Step 19.
2010 and later four-cylinder and all V6 models
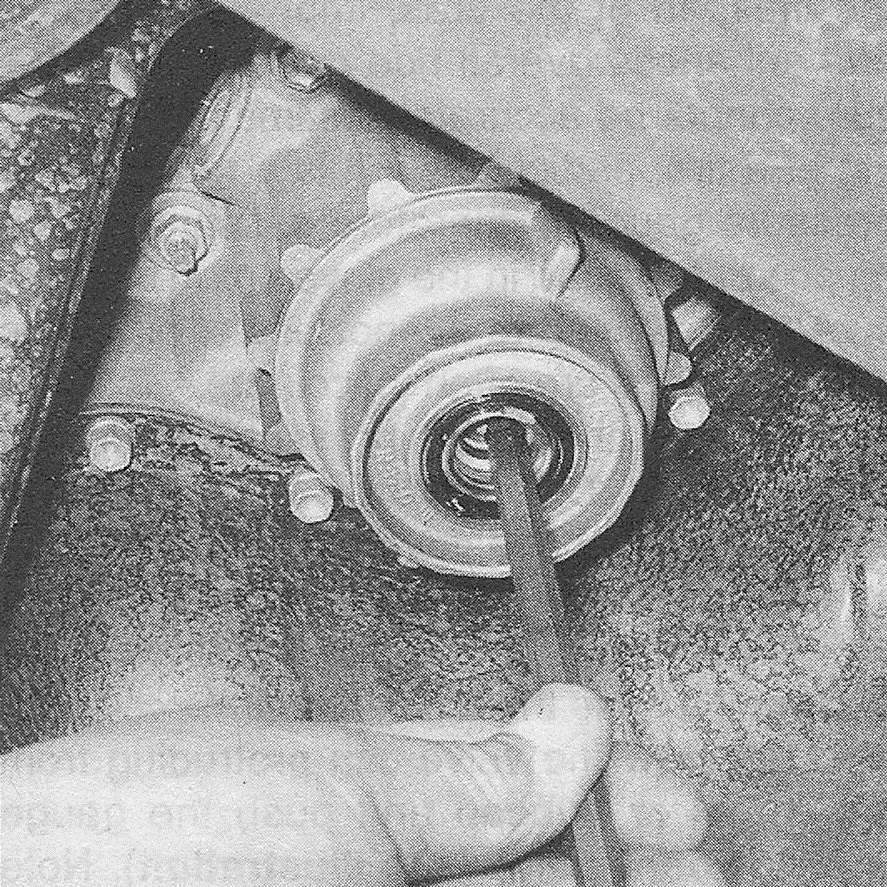
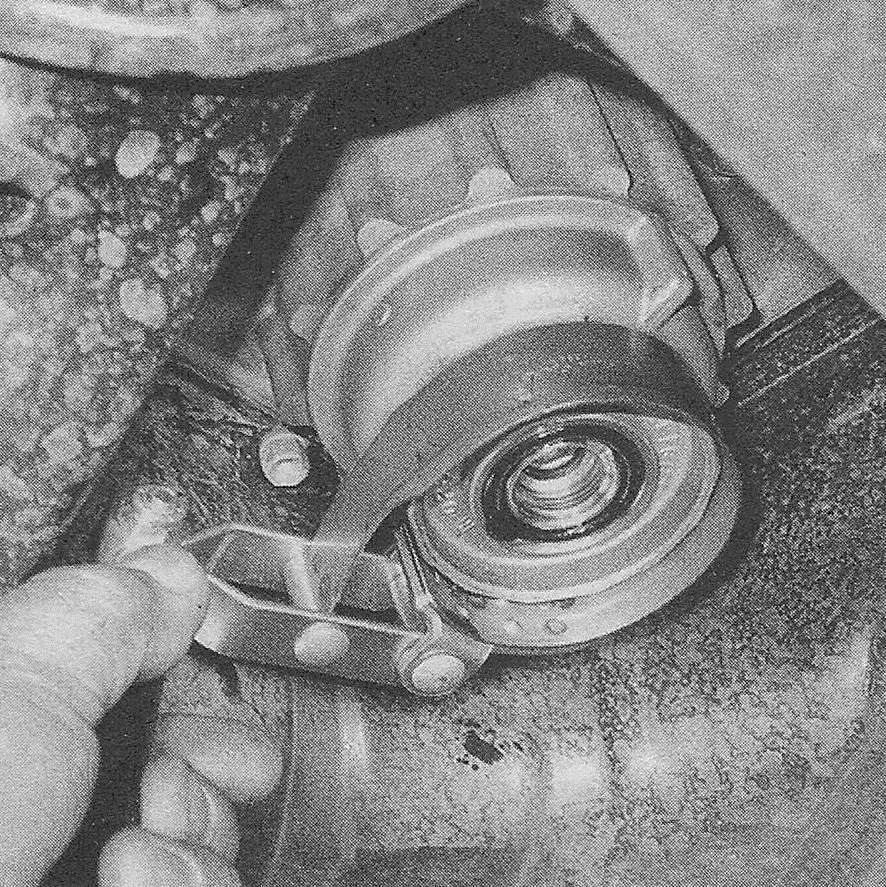
16. Use a ratchet with an extension to remove the plug from the bottom of the oil filter housing, being careful to minimize the inevitable spillage (see illustration). You can then use a blunt tool to push up the inner valve and allow the canister to drain (see illustration).
Note: A special tool is available for this that includes a drain hose in order to make the job as clean as possible. Unscrew the main oil filter housing. If it’s too tight to be removed by hand, you can use an oil filter wrench (see illustration).
6.16a Use a 3/8-inch drive extension to remove the oil filter housing drain plug the entire filter housing can be removed instead, but it creates more spillage
6.16b the filter housing can be drained by inserting a blunt tool to lift the drain valve — be sure to have the drain pan centered under the filter
6.16c the main filter housing can usually be unscrewed by hand — if it’s stuck, you’ll have to use an oil filter wrench, but be careful as the housing can be easily damaged
17. Remove the filter element and the large 0-ring from the housing.
Note: Don’t use a metal tool to remove the 0-ring, as this may scratch the soft housing.
18. Carefully clean all components and the engine block sealing area. Install a new 0-ring and filter, then screw the assembly back onto the engine. Tighten it to the torque listed in this Chapter’s Specifications. If you removed the drain plug, clean it thoroughly, install a new 0-ring and tighten the plug to the torque listed in this Chapter’s Specifications. Lower the vehicle.
All models
19. Add new oil to the engine through the oil filler cap in the valve cover. Use a funnel to prevent oil from spilling onto the top of the engine. Pour four (four-cylinder engines) or five (V6 engine) quarts of fresh oil into the engine. Wait a few minutes to allow the oil to drain into the pan, then check the level on the oil dipstick (see Fluid level checks if necessary). If the oil level is at or near the F mark, install the filler cap hand tight, start the engine and allow the new oil to circulate.
20. Allow the engine to run for about a minute. While the engine is running, look under the vehicle and check for leaks at the oil pan drain plug and around the oil filter. If either is leaking, stop the engine and tighten the plug or filter slightly.
21. Wait a few minutes to allow the oil to trickle down into the pan, then recheck the level on the dipstick and, if necessary, add enough oil to bring the level to the F mark.
22. During the first few trips after an oil change, make it a point to check frequently for leaks and proper oil level.
23. The old oil drained from the engine cannot be reused in its present state and should be discarded. Oil reclamation centers, auto garages and gas stations will normally accept the oil, which can be refined and used again. After the oil has cooled, it can be drained into a suitable container (capped plastic jugs, topped bottles, milk cartons, etc.) for transport to one of these disposal sites.
Service reminder light resetting
24. Turn the ignition key to the on position and depress the button to the right of the speedometer until the odometer is displayed.
25. Turn the ignition key to the Off position.
26. Depress the button again and hold it, then turn the ignition key to the on position. Hold the button in the depressed position for five seconds.
27. The odometer should indicate «000000» and the MAINT REQD light should turn off.